Adding a User Account

Written by Allen Wyatt (last updated January 24, 2019)

1

If you have multiple people who use a single computer, you can use Windows to create different accounts for each of those users. User accounts allow you to define various personalization settings (such as screen appearance) and different programs to be used by that user. Here's how you set up a new user account if you are using Windows 7:
  1. Display the Control Panel.
  2. At the right side of the screen, under the main heading of User Accounts and Family Safety, click Add or Remove User Accounts. Windows displays a screen showing the accounts currently set up on your system.
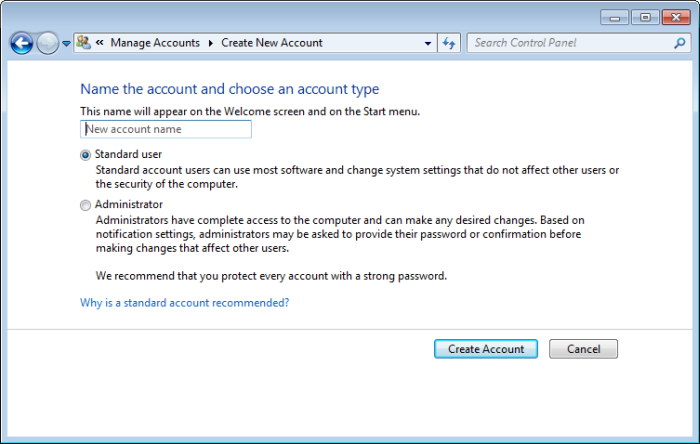
  3. Click Create a New Account. Windows displays the Create New Account screen. (See Figure 1.)
  4. Figure 1. The Create New Account screen.

  5. Enter a name for the account you want to create.
  6. Specify what type of user you are creating, Standard or Administrator.
  7. Click on Create Account. Windows creates the account and returns you to the screen first displayed in step 2.

The name you enter in step 4 is typically the name of the user you'll associate with this account. For instance, if you are setting up an account for Bob Smith (perhaps a co-worker or family member), you would enter "Bob Smith" as the account name. However, you may want to use a position or purpose name instead of a person's name. For instance, if your computer is in your office and several people work with Accounts Payable, you may want to use that name ("Accounts Payable") as the name for the user account. Then you can allow several different people to log in and use your computer under that single user account.

If you are using Windows 8, then user accounts are handled somewhat differently. This is because, for most users of Windows, the accounts do not reside on your local system—they are controlled over the Internet as "Microsoft Accounts." You get a hint of this when you first install Windows 8 or when you log into a Windows 8 system.

Because of this, you can't follow the same steps presented earlier; there is no "Add or Remove User Accounts" option that you can use. Instead, follow these steps:

  1. Display the Charms at the right side of your screen (press Win+C).
  2. Click the Settings charm. The Settings options appear at the right side of the screen.
  3. Click the Change PC Settings option, at the very bottom of the Settings area. Windows displays the PC Settings screen.
  4. Click the Accounts option at the left of the screen. Windows displays the Accounts screen.
  5. Click Other Accounts.
  6. Click Add an Account.

At this point you are prompted to enter the e-mail address that the person uses to sign into Microsoft services. That's great if you know it and if that person has such an account. If they don't, you'll need to choose to "Sign Up for a New Email Address" to set up an account, or you can click the Sign In Without a Microsoft Account option to try setting up one the old-fashioned way.

You should know that in order to add user accounts you must be logged into your computer using an account that has administrator privileges.

Follow these steps if you are using Windows 10:
  1. Display the Control Panel.
  2. At the right side of the screen, click User Accounts | User Accounts | Manage Another Account. Windows displays a screen showing the accounts currently set up on your system.
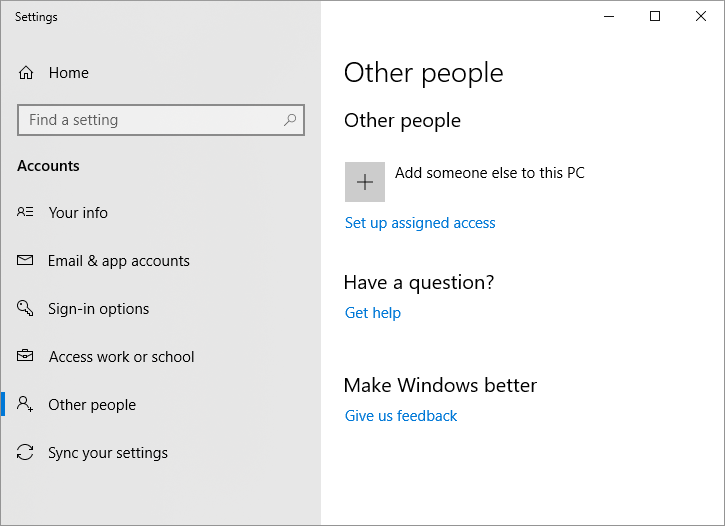
  3. Click the Add a New User in PC Settings link. Windows displays the Other People screen. (See Figure 2.)
  4. Figure 2. The Other People screen.

  5. Click the Add Someone Else to this PC option. Windows displays the lusrmgr-[Local Users and Groups (Local)] window.
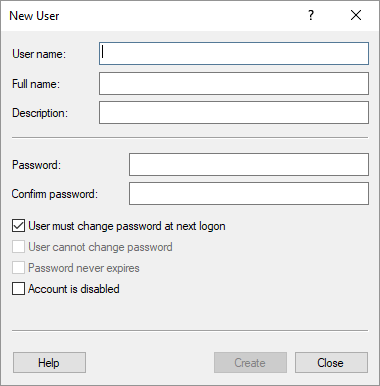
  6. Right-click Users then choose New User from the resulting context menu. Windows displays the New User dialog box. (See Figure 3.)
  7. Figure 3. The New User dialog box.

  8. Fill in the dialog box as desired. You don't have to set up the user with a password. Just uncheck the User Must Change Password at Next Logon checkbox.
  9. Click Create, then Close.

 This tip (10710) applies to Windows 7, 8, and 10.

Author Bio

Allen Wyatt

With more than 50 non-fiction books and numerous magazine articles to his credit, Allen Wyatt is an internationally recognized author. He is president of Sharon Parq Associates, a computer and publishing services company. ...

MORE FROM ALLEN

Opening a Text File and Template from the Command Line

Word includes a command-line syntax that you can use to open files and do other operations. If you want to load a text ...

Discover More

Moving Subtotals

When you add subtotals to a worksheet, Excel typically places them in the same column that you are subtotaling. If you ...

Discover More

Printing Workbooks in a Folder

This tip presents two techniques you can use to print multiple workbooks all at the same time. Both techniques involve ...

Discover More
More WindowsTips

Creating a PIN for Sign-in

Add an extra level of security to your computer to protect your data. A PIN allows for added peace of mind and use.

Discover More

Understanding the Guest Account

If lots of people may need temporary access to your computer, then you may want to set up the Guest user account. Before ...

Discover More

Using the Sign Out Feature

To switch users without going through the lengthy reboot process, just sign out. It's not too obvious how to do this, but ...

Discover More
Comments

If you would like to add an image to your comment (not an avatar, but an image to help in making the point of your comment), include the characters [{fig}] (all 7 characters, in the sequence shown) in your comment text. You’ll be prompted to upload your image when you submit the comment. Maximum image size is 6Mpixels. Images larger than 600px wide or 1000px tall will be reduced. Up to three images may be included in a comment. All images are subject to review. Commenting privileges may be curtailed if inappropriate images are posted.

What is 2 + 2?

2015-08-04 11:20:20

Miguel Suárez

Hi there. I just upgraded my Windows 7 Home Premium Edition to Windows 10 Home and the process created a directory named "Windows.Old". This directory occupy Gigabytes of hard disk space. I indeed want to delete those Windows.Old files, but many requires "TrustedInstaller" permissions to do it; so, how can I delete those files? I'm the administrator and the only user of my Windows 10 Home based PC. Thanks for your help.


Newest Tips