Enabling and Disabling Windows Features

Written by Allen Wyatt (last updated July 15, 2019)

Windows includes a ton of built-in features designed to be used by a wide variety of people. Of course, there is a good chance that you may not need all the features provided by Windows, or there may be some features that are disabled by default and you want to enable.

To enable or disable features, follow these steps:

  1. Display the Control Panel.
  2. Click the Programs link. Windows displays a screen showing what program-related tasks you can perform.
  3. Click the Turn Windows Features On or Off link, under the Programs and Features heading. Windows displays all the Windows Features dialog box. (See Figure 1.)
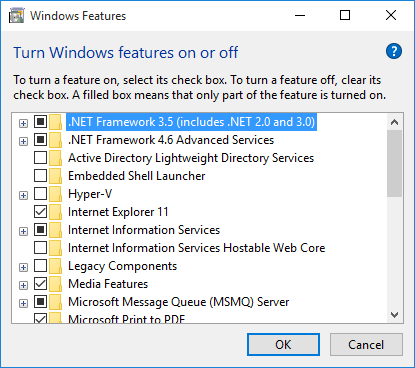
  4. Figure 1. The Windows Features dialog box.

  5. Use the check boxes at the left side of each feature to indicate whether the corresponding feature should be enabled (checked) or disabled (unchecked).
  6. Click OK. Windows updates itself according to your selections. (Some changes may require restarting Windows.)

Note that you may see some checkboxes in the features list that aren't clear and, conversely, they don't contain a check mark. Instead, they are filled with a gray color. These aren't individual features but, instead, are categories of features. Click the plus sign next to such items and they expand to show you individual features in that category that can be enabled or disabled.

It's a good idea to only disable those Windows features that you know you really don't need. If you are in doubt about a particular feature, study up on it to make sure it is one you really want to disable.

 This tip (10133) applies to Windows 7, 8, and 10.

Author Bio

Allen Wyatt

With more than 50 non-fiction books and numerous magazine articles to his credit, Allen Wyatt is an internationally recognized author. He is president of Sharon Parq Associates, a computer and publishing services company. ...

MORE FROM ALLEN

Inserting Dashes between Letters in Words

Sometimes typing isn't straight typing. Sometimes you need to perform special tasks, such as putting dashes between ...

Discover More

Setting the Width for Row Labels

Excel displays, by default, a row label or heading at the left side of each row on the screen. As you scroll down the ...

Discover More

Ordering Worksheets Based on a Cell Value

Need to sort your worksheets so that they appear in an order determined by the value of a cell on each worksheet? Using a ...

Discover More
More WindowsTips

Adding the Administrative Tools Option

Windows provides a number of administrative programs that can be very helpful when managing your system. It's useful to ...

Discover More

Understanding ReadyBoost

ReadyBoost promised to provide a hot-swappable addition of memory that could end up improving system performance. Whether ...

Discover More

Opening HEVC and HEIF Files

HEVC and HEIF are two new popular graphics file formats that are gaining support. Getting your Windows 10 computer setup ...

Discover More
Comments

If you would like to add an image to your comment (not an avatar, but an image to help in making the point of your comment), include the characters [{fig}] (all 7 characters, in the sequence shown) in your comment text. You’ll be prompted to upload your image when you submit the comment. Maximum image size is 6Mpixels. Images larger than 600px wide or 1000px tall will be reduced. Up to three images may be included in a comment. All images are subject to review. Commenting privileges may be curtailed if inappropriate images are posted.

What is 9 - 7?

There are currently no comments for this tip. (Be the first to leave your comment—just use the simple form above!)


Newest Tips