The Windows Firewall is a software subsystem that can protect your computer from attacks coming from hackers on the Internet. It can be set up to allow only certain inbound connections and/or only certain outbound connections. In this way, a rogue user outside of your firewall cannot get at your computer, but you will still be able to access the Internet from behind your firewall.
While Windows 7 and 8 refer to this subsystem as Windows Firewall, Microsoft changed the name slightly in Windows 10 to Windows Defender Firewall. For the sake of simplicity, in this tip I refer to this feature as Windows Firewall. (So, if you are using Windows 10, understand that all references to Windows Firewall also apply to Windows Defender Firewall.)
By default, in Windows 7, 8, and 10, Windows Firewall is turned on. You can, however, turn it off or modify its settings. To turn off Windows Firewall, go to Start | Control Panel | Windows Firewall. In Windows 10 go to Control Panel | System and Security | Windows Defender Firewall. Alternatively, in Windows 10 you use the Search box, enter Windows Defender Firewall, and then press Enter.
Whichever method or version of Windows you use, Windows will display the Windows Firewall portion of the Control Panel. (See Figure 1.)

Figure 1. The Windows Firewall portion of the Control Panel.
Click the Turn Windows Firewall On or Off link in the left pane. Windows displays a screen that allows you to customize the Windows Firewall settings. (See Figure 2.)
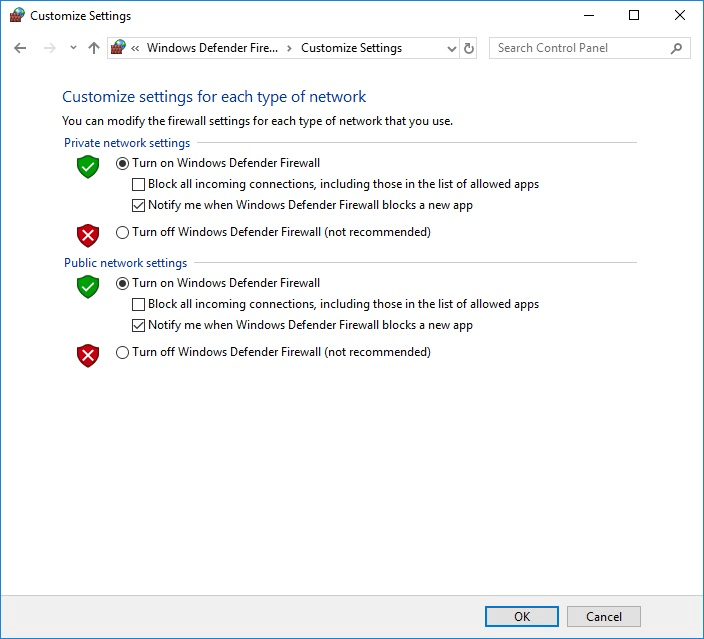
Figure 2. Customizing the Windows Firewall.
From here you can click the radio buttons to turn off the firewall for each type of network location (domain, private, and public).
In reality, the only reason to turn off Windows Firewall is if you are having a problem using one of your programs with it activated. Instead of turning off all the firewall protection, however, you can simply instruct Windows Firewall to allow your program to work through the firewall. Follow the steps above to start Windows Firewall. Again, the Windows Firewall portion of the Control Panel appears. Click the link in the left pane that says, “Allow a Program or Feature through Windows Firewall.” Windows displays a screen that shows the programs that can work through the firewall. (See Figure 3.)
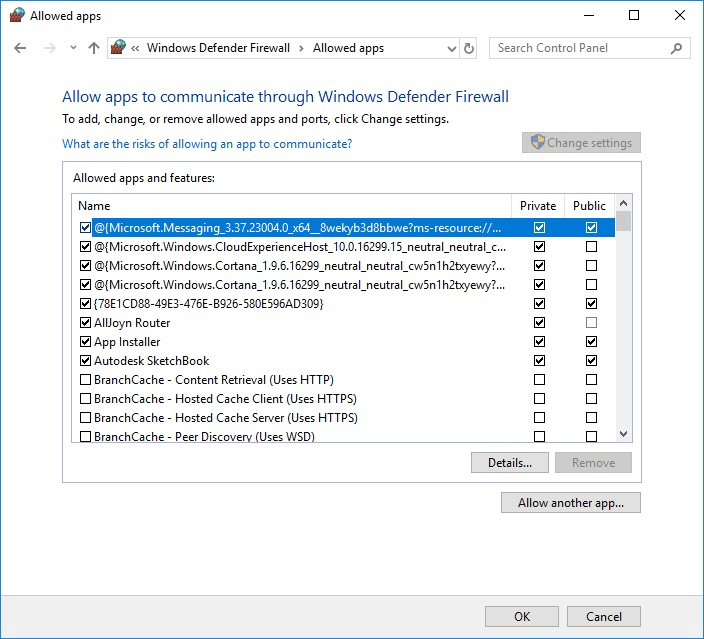
Figure 3. Allowing programs to work through Windows Firewall.
If a box is checked, it means the program is allowed through the firewall; unchecked means the program is not allowed through. Just as you can turn the firewall on and off for each type of network location, so to can you allow or disallow programs for each type of network location.
If the program you want to allow through is not listed, click the Allow Another App button, which brings up a screen that allows you to select the desired program. If you want to remove a program from the list, select the program and click the Remove button.
As we've discussed, Windows Firewall can help protect your computer from attacks coming from hackers. Because of this added protection it is always recommended to leave Windows Firewall running.
![]()
![]()
![]() This tip (10109) applies to Windows 7, 8, and 10.
This tip (10109) applies to Windows 7, 8, and 10.
Windows installs updates automatically by default. If you want to remove an update, this tip tells you how.
Discover MoreAre the icons on your desktop displayed at the right size for your preference or needs? Windows provides three different ...
Discover MoreSometimes the "Send to | Desktop (create shortcut)" option disappears, or perhaps it was never there in the first place. ...
Discover MoreThere are currently no comments for this tip. (Be the first to leave your comment—just use the simple form above!)
Copyright © 2026 Sharon Parq Associates, Inc.

Comments