Adjusting the Cursor Blink Rate

Written by Allen Wyatt (last updated June 24, 2019)

Have you noticed how, sometimes, Microsoft uses different words to describe the exact same thing? For instance, if you are a Microsoft Word fan, you have undoubtedly seen reference to the "insertion point." This is the blinking cursor, on screen, that indicates where whatever you type will start to appear. In other programs this "insertion point" is simply referred to as a "cursor." In fact, that's what Windows refers to it as—the cursor.

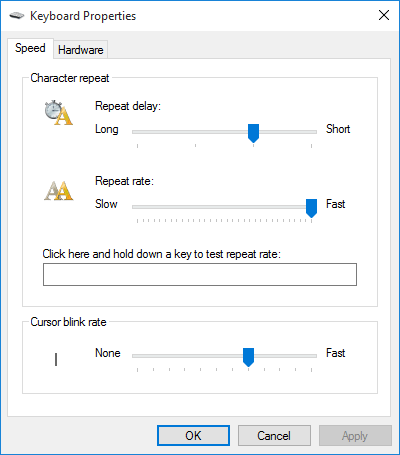
In fact, Windows gives you a bit of control over that cursor. Specifically, you can adjust how quickly the cursor blinks on the screen. The way you do that is to follow these steps:
  1. Display the Control Panel.
  2. In the search box (upper-right corner of the Control Panel window) type "keyboard" (without the quotes). Windows displays several matching options.
  3. Click the Keyboard link. Windows displays the Keyboard Properties dialog box with the Speed tab selected. (See Figure 1.)
  4. Figure 1. The Keyboard Properties dialog box.

  5. Use the Cursor Blink Rate slider to adjust how quickly the cursor blinks.
  6. Click on OK to close the Keyboard Properties dialog box.
  7. Close the Control Panel.

Any change you make to the cursor blink rate takes effect immediately.

 This tip (10044) applies to Windows 7, 8, and 10.

Author Bio

Allen Wyatt

With more than 50 non-fiction books and numerous magazine articles to his credit, Allen Wyatt is an internationally recognized author. He is president of Sharon Parq Associates, a computer and publishing services company. ...

MORE FROM ALLEN

An Automatic File Name

Do you have a set "standard" for how you name new documents? If so, you may be interested in implementing the technique ...

Discover More

Removing Hyperlinks without a Macro

If you have a whole slew of hyperlinks in a worksheet and you want to get rid of them, it's easier than you think. This ...

Discover More

Removing Pictures for a Worksheet in VBA

Excel allows you to add pictures to your worksheet, even within a macro. However, you might have a bit harder time ...

Discover More
More WindowsTips

Connecting a Bluetooth Device

If you're the proud owner of a Bluetooth device, you probably want to get right to connecting it to your computer. This ...

Discover More

Using Powercfg to List Your Existing Power Schemes

Windows allows you to define different power schemes that control how your computer uses power. This tip shows you how to ...

Discover More

Disabling Automatic Driver Installation

Whenever you plug something into your computer, Windows dutifully tries to find and install the driver for your new ...

Discover More
Comments

If you would like to add an image to your comment (not an avatar, but an image to help in making the point of your comment), include the characters [{fig}] (all 7 characters, in the sequence shown) in your comment text. You’ll be prompted to upload your image when you submit the comment. Maximum image size is 6Mpixels. Images larger than 600px wide or 1000px tall will be reduced. Up to three images may be included in a comment. All images are subject to review. Commenting privileges may be curtailed if inappropriate images are posted.

What is 2 + 2?

There are currently no comments for this tip. (Be the first to leave your comment—just use the simple form above!)


Newest Tips