If you don't like the way the drive letters are assigned to your disk drives, Windows gives you a way to change them. You can even assign a static drive letter to a particular USB port, so that any device plugged into that port will take on that drive letter.
Changing the drive letter is a rather easy task, provided you know where to look. You can make the changes by using the Computer Management utility. The easiest way to start the utility is to use the search capabilities of Windows to look for "computer management" (without the quote marks). Once started, expand the Storage option (left side of the screen) and click Disk Management. (See Figure 1.)
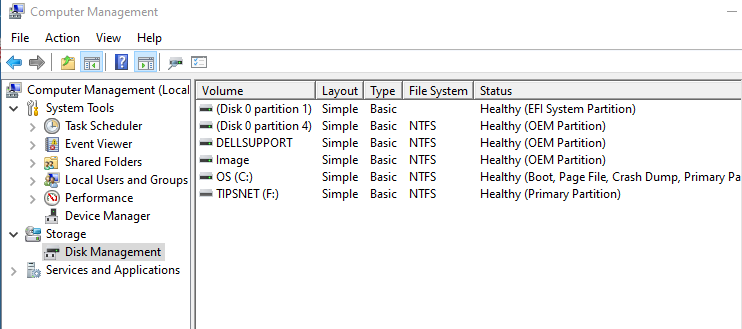
Figure 1. Disk Management details.
Notice that I have a volume called "TIPSNET" that's associated with drive letter "F:". Say that I want the drive letter to be "G:" instead. If I right-click on the volume name and select "Change Drive Letter and Paths" from the resulting Context menu, Windows displays a dialog box that shows the drive letter assigned to the drive. (See Figure 2.)
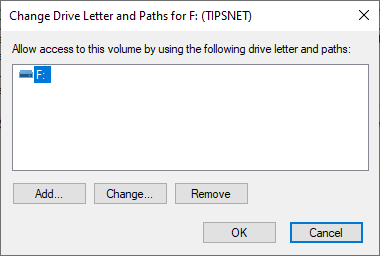
Figure 2. The Change Drive Letter and Paths dialog box.
All I need to do is select the current drive, then click on the Change button. Windows displays a dialog box that includes a drop-down list where I can pick a drive letter to be used for the drive. (See Figure 3.)
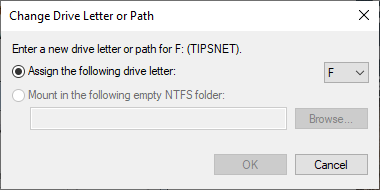
Figure 3. Changing the Drive Letter.
As soon as I pick a drive letter and click OK, Windows verifies that I really want to make the change. Assuming I answer in the affirmative, the change is made and reflected in the Computer Management utility.
![]()
![]()
![]() This tip (5668) applies to Windows 7, 8, and 10.
This tip (5668) applies to Windows 7, 8, and 10.
Robocopy is a robust file copy utility built into Windows. The various switches built into the program provide very ...
Discover MoreWindows makes it easy to break the association between a network drive and its assigned letter. This tip explains how.
Discover MoreDoing a one-time create of a system repair disk can be worth its weight in gold if you find yourself unable to boot your ...
Discover MoreThere are currently no comments for this tip. (Be the first to leave your comment—just use the simple form above!)
Copyright © 2026 Sharon Parq Associates, Inc.

Comments