Although it takes a bit of time to create a system repair disk, having one will more than pay for itself should you ever find yourself with an unbootable system. Having the original Windows installation disk can serve the same purpose, but many systems do not come with the installation disk. It is therefore recommended that you create your own repair disk, and you may find it more convenient to have this image on a USB drive.
Creating a system repair image on a USB drive is a two-step process. First, you need to create the image on a physical disk. Then you need to get that image onto a dedicated USB drive. To accomplish these steps, follow the process described below.

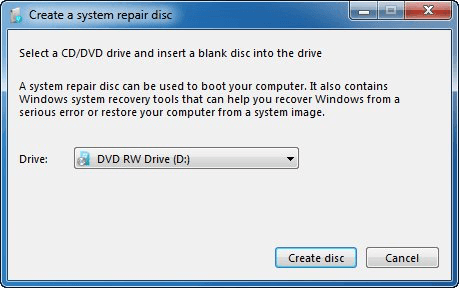
Figure 1. The Create a System Repair Disc dialog box.

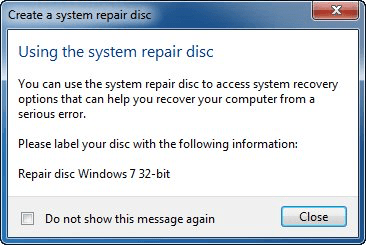
Figure 2. Your System Repair Disc is Completed.
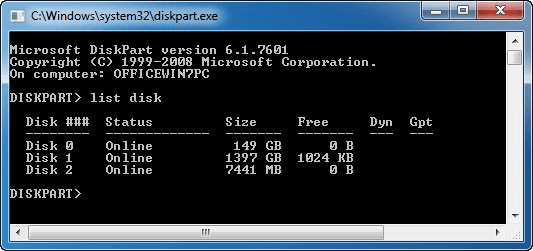
Now that you have a system repair disc, you need to copy the information on the disc to a USB flash drive. Insert a blank USB drive into the computer. Get to a command prompt window and type "diskpart" (without the quotes) and press Enter. This invokes the DiskPart utility. Type "list disk" (again, without the quotes) and press Enter. DiskPart will list the disks it detects. (See Figure 3.)

Figure 3. DiskPart's listing of the available disks.
I know by looking down the "Size" column that my USB drive is Disk 2. (If you're not sure, unplug your USB drive, and do another "list disk" to see which disk disappeared. Then plug it back in, do a third "list disk", and note the disk number of your USB disk.) Select the USB drive by typing the following:
DISKPART> select disk 2
If your USB drive is different than on my system, make sure you supply the correct disk number for your USB drive. Type the following commands:
DISKPART> clean
DISKPART> create partition primary
DISKPART> select partition 1
DISKPART> active
DISKPART> format fs=NTFS
DISKPART> assign
DISKPART> exit
The last thing to do is to now copy the three items (two folders and one file) from your system repair disc (the CD or DVD you created) to your USB drive. You now have a system repair USB drive.
![]() This tip (12645) applies to Windows 7.
This tip (12645) applies to Windows 7.
If you have an important file that you want to be sure doesn't get accidentally edited, you can set it to read-only. This ...
Discover MoreYou can fine-tune Indexed Searches by adding locations to the search index. This tip tells you how.
Discover MoreRemoving a file type program association is a task for third-party utilities. You can, however, change the association ...
Discover More2016-07-14 05:54:58
anne
followed your instructions for creating a system repair disk in a USB flash drive
didn't recognize my usb drive
Windows 7 premium home
Have created a CD repair disc but cant get it to boot no options in my bios
2016-05-09 02:25:34
Barry
I would go ahead as planned. I can't imagine that simply copying it on another computer would invalidate the data.
2016-05-08 19:47:44
john barto
i created a win 7 dvd repair disk and my dvd recorder broke down. now I want to copy the repair disk to a usb key on another win 7 computer. I am told that it has to be done on the same pc or it will be rejected, but as I created the repair disk on this computer I expect it to work on this computer even though the copyimng was done on another. Should I go ahead as planned?
2015-12-22 22:20:20
Jeff G
Jim: Barry is correct, and just so you know, the files, for me at least, were less than 200 MB in total. Any flash drive sold these days should be able to hold dozens of copies.
2015-12-22 08:47:57
Barry
The size of the USB drive will be about the same as the size of the data written to your DVD.
2015-12-22 08:29:36
Jim
How can I determine in advance the size of the flash drive needed?
2015-12-21 16:30:09
Jeff G
Excellent instructions, thank you so much. I looked at many more complicated methods before I found this. I tried them, and they work very well.
2015-12-07 07:54:54
Barry
I doubt it's the same procedure for Windows 10, but I don't know for sure.
This is not a backup of your data files, so no, this isn't the backup you want to have before upgrading to Windows 10.
2015-12-07 07:34:32
Vincent
Will this not work for Windows 10?
2015-12-07 07:27:42
Barbara
Can this be the back-up you talk about when making a back-up before downloading Windows 10?
Copyright © 2026 Sharon Parq Associates, Inc.
Comments