Clearing Items from the Recently Used Documents List

Written by Barry Dysert (last updated December 3, 2018)

The documents you work with on your system tell a lot about you. Windows helpfully keeps track of which documents you've recently used so that you can easily call them up again, but you may not want this list to be visible. You may have privacy concerns, or perhaps you share your computer with others. Whatever the case, you may want to clear items from the Recently Used Documents list.

The Recently Used Documents list maintained by Windows is often referred to as the MRU—Most Recently Used list. It appears if you've customized your Start menu to display Recent Items. It contains a list of recently used files. The Start menu's MRU list is different from the applications' jump lists, which are discussed in a separate tip.

Unlike in previous versions of Windows, clearing items from the MRU list is now built into the operating system, and there are a few different techniques you can use.

Clearing the MRU and Jump Lists on Exit

One way to ensure the MRU list is cleared is by setting up Windows to automatically clear the list upon exiting Windows. Note that this will also clear the jump lists' MRUs. This is accomplished by taking the following steps:

  1. Click the Start button (Windows 7) or click the Windows icon (Windows 8 or Windows 10).
  2. At the bottom of the Start menu, type gpedit.msc and press Enter. If you are using Windows 8 or Windows 10, type gpedit.msc in the Search box and press Enter This displays the Local Group Policy Editor.
  3. Using the controls at the left side of the dialog box, navigate to User Configuration | Administrative Templates | Start Menu and Taskbar. (See Figure 1.)
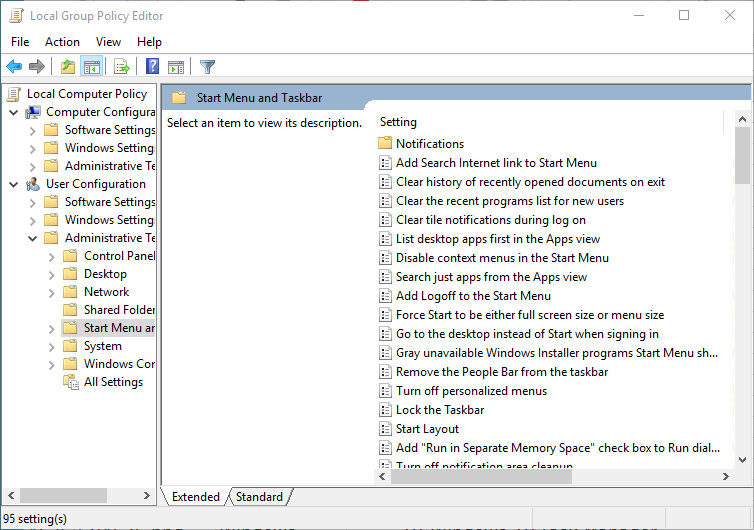
  4. Figure 1. The Local Group Policy Editor.

  5. In the right pane, double-click on Clear History of Recently Opened Documents on Exit. Windows displays the policy window for this setting. (See Figure 2.)
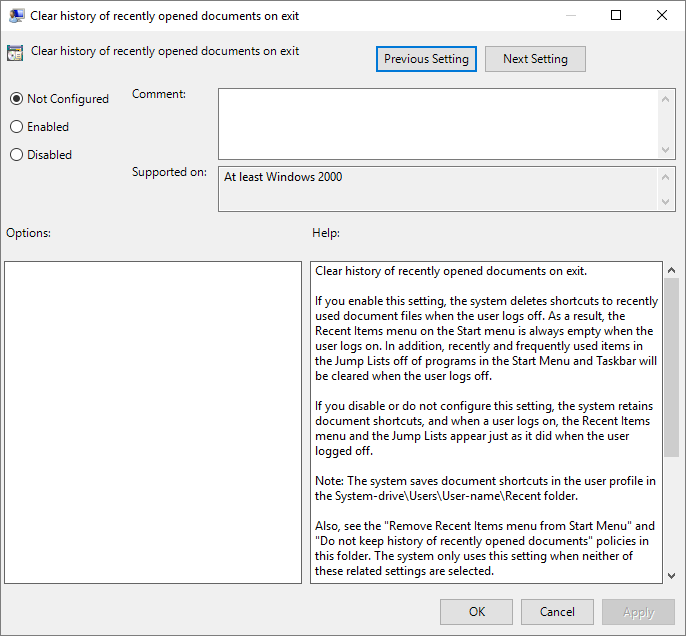
  6. Figure 2. The policy window for the Clear History of Recently Opened Documents on Exit setting.

  7. Click the Enabled radio button.
  8. Click OK to close the policy window.
  9. Close the Local Group Policy Editor window.
  10. Restart your computer.

To revert the system back so that the MRU is not cleared on exit, follow the above steps, except click the Disabled radio button in Step 5.

Clearing the MRU and Jump Lists One Time

You can do a one-time clearing of the MRU and those of the jump lists without the need to restart Windows. To do this, follow these steps if you are using Windows 7 or Windows 8:

  1. Right-click the Start button and select Properties from the resulting Context menu. Windows displays the Taskbar and Start Menu Properties dialog box.
  2. Make sure the Start Menu tab is displayed. (It should be displayed by default.) (See Figure 3.)
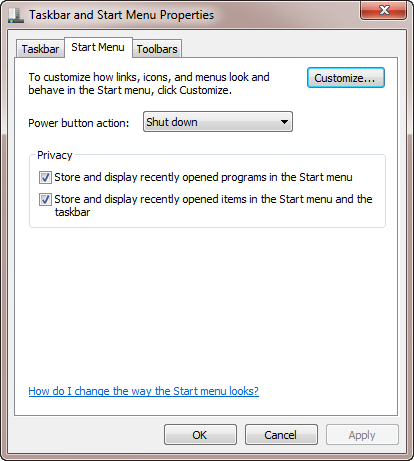
  3. Figure 3. The Start Menu tab of the Taskbar and Start Menu Properties dialog box.

  4. Uncheck the Store and Display Recently Opened Items in the Start Menu and the Taskbar checkbox.
  5. Click OK.

To revert the system back so that it does remember recently opened items, go through the same process but select the check box in step 3.

If you are using Windows 10, follow these steps to clear the MRU and those of the jump lists without the need to restart Windows:

  1. Type "Taskbar Settings" (without the quotes) in the Search bar. Windows displays the Taskbar section of the Settings window. (See Figure 4.)
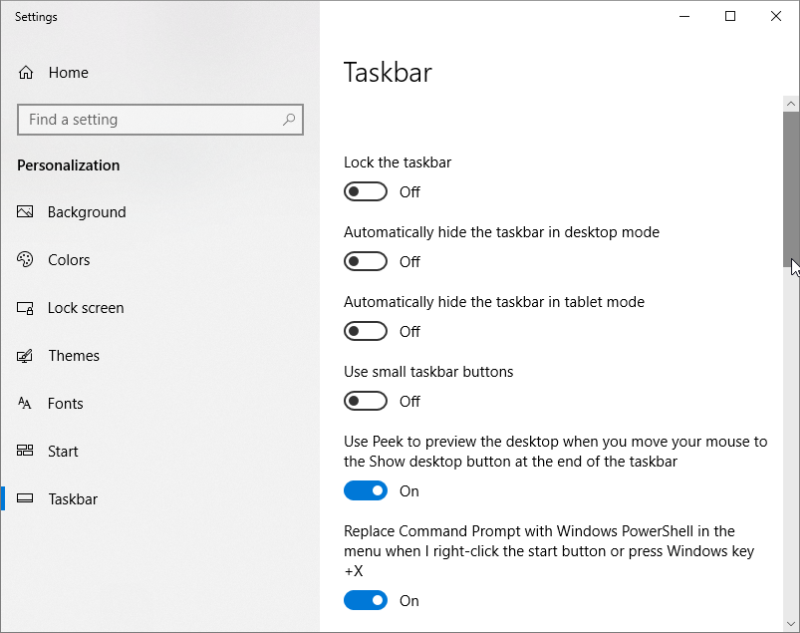
  2. Figure 4. The Taskbar section of the Settings window.

  3. On the left side of the window, click Start. Windows displays the Start section of the Settings window. Disable the "Show recently opened items in Jump Lists on Start or the taskbar" button by switching to Off as shown in the following figure: (See Figure 5.)
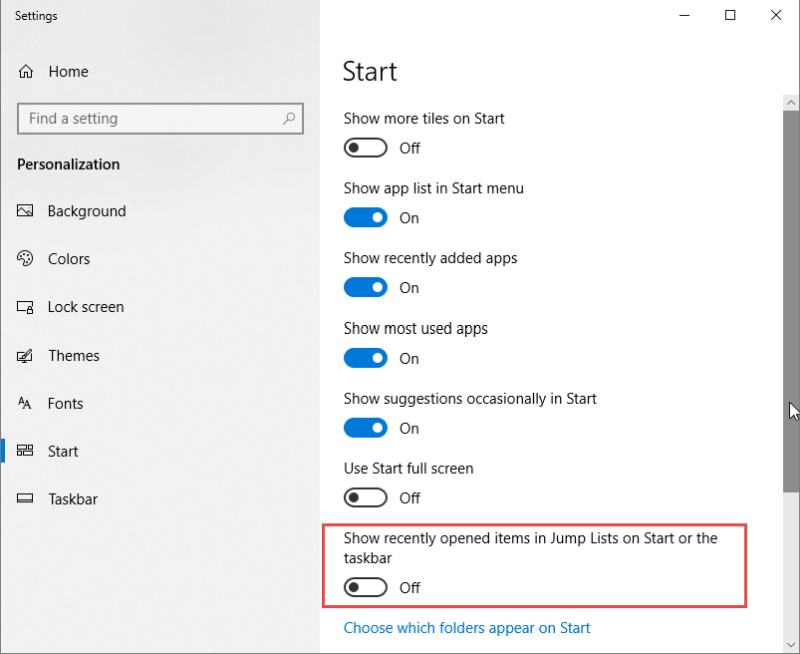
  4. Figure 5. Turning off jump lists on Start and the Taskbar.

To revert the system back so that it does remember recently opened items, go through the same process but turn the button in step 2 back to On.

Immediately Clearing the MRU in Windows 7

If you want to immediately clear the MRU without also clearing the jump lists, first click on the Start button, then right-click the Recent Items link that appears in the right half of the Start menu. In the resulting Context menu, click Clear Recent Items List.

 This tip (12116) applies to Windows 7, 8, and 10.

Author Bio

Barry Dysert

Barry has been a computer professional for over 35 years, working in different positions such as technical team leader, project manager, and software developer. He is currently a software engineer with an emphasis on developing custom applications under Microsoft Windows. When not working with Windows or writing Tips, Barry is an amateur writer. His first non-fiction book is titled "A Chronological Commentary of Revelation." ...

MORE FROM BARRY

Making the Mouse Pointer More Visible

Windows has a lot of features designed to make your computing experience easy on the eyes. Some of these features have to ...

Discover More

Turning On the Display of File Extensions

Windows is configured, by default, to hide file extensions. This could be confusing or outright dangerous. For example, ...

Discover More

Refreshing the Explorer Window

It's possible that the Windows Explorer window may occasionally get out of sync with the data it's displaying. You can ...

Discover More
More WindowsTips

Renaming Multiple Files

Got a bunch of files you need renamed? Windows can help you out, but only in a limited manner. This tip shows you how.

Discover More

Specifying a Copy Schedule in Robocopy

There are a few ways to set up a copy schedule in Robocopy by using its options. This tip explains how.

Discover More

Ways to Combine Two (or More) Text Files

There have probably been times when you've wanted to combine two or more text files into one. Windows provides a few ...

Discover More
Comments

If you would like to add an image to your comment (not an avatar, but an image to help in making the point of your comment), include the characters [{fig}] (all 7 characters, in the sequence shown) in your comment text. You’ll be prompted to upload your image when you submit the comment. Maximum image size is 6Mpixels. Images larger than 600px wide or 1000px tall will be reduced. Up to three images may be included in a comment. All images are subject to review. Commenting privileges may be curtailed if inappropriate images are posted.

What is four minus 0?

There are currently no comments for this tip. (Be the first to leave your comment—just use the simple form above!)


Newest Tips