Most Windows users have a printer set up to work with their system. Some users will have more than one printer defined within Windows, each printer designed for a specific purpose. (For instance, you might have a laser printer for your regular output and an inkjet printer for your color output.)
In some situations—particularly in large offices—you might run into a situation where you don't have a specific printer associated with your Windows system. Instead, your department or workgroup might share what is termed a printer pool. This is typically a group of identical printers, stuffed into a cubicle or room down the hall. Everyone prints to the pool, and then trots down to grab their print job from those printers.
The benefit of a printer pool is that one or two users could print long documents (tying up one or two printers in the pool), but that won't stop other print jobs from being output on the remaining printers in the pool. Similarly, an individual printer in the pool could go offline for some reason (perhaps it is out of paper or ink) and others in your group would still be able to print to the remaining pool printers.
You create a printer pool on your Windows system by simply identifying which printers belong to the pool. Once created, the pool appears as a single printer on your system—you print to that printer, and Windows takes care of directing the output to the actual printers in the pool.
This brings up an important point about printer pools—the printers in the pool must be identical, meaning that they all use the exact same printer driver. To create the pool, simply display the Properties dialog box for the first printer you want included in the pool. (You should already have added this printer to your system; that process makes sure the proper printer driver used by all the printers in the pool is installed.) Follow these steps:
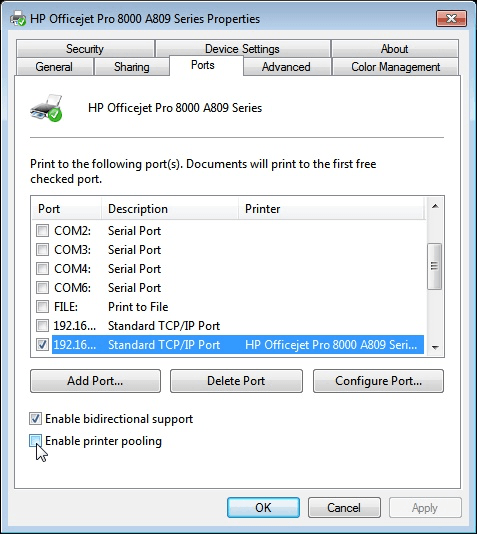
Figure 1. The Properties dialog box for a printer.
It is step 6 that is the important one. By selecting the Enable Printer Pooling check box, you make it possible to select multiple ports to be included in the pool. If you don't select the check box, you can only associate a single port with the printer driver.
With your printer pool created, you can simply print to the printer, as you normally would. Windows then, behind the scenes, plays "traffic cop" and directs your printer output to a specific printer in the pool.
![]()
![]()
![]() This tip (13141) applies to Windows 7, 8, and 10.
This tip (13141) applies to Windows 7, 8, and 10.
Windows includes the ability to print a test page to a printer. This is a good idea when you want to check whether the ...
Discover MoreXPS Documents have been around for several years and are now making their way into the native Windows environment. They ...
Discover MoreWant to easily create a PDF file from your favorite program? Windows 10 makes it easy with a built-in PDF printer driver. ...
Discover More2018-04-28 06:34:54
andrea cappini
Hello Allen,
this is my situation: windows server 2012 r2 std which is DC. Installed feature print management. Installed correct driver for a printer (INEO 758) and then created a printer pool by enabling printer pool and clicking 2 different IP ports (yes, we have two identical phisical printers).
I have created a GPO to distribute this printer, so clients see only one printer configured in their systems.
Now the problem: during tests I figure that only the same phisical printer start to print jobs. If I launch a very long job, and subsequentially launch a second one, the phisical printer that is idle never starts to print. The second job is queued to the printer that is printing the first one.
Copyright © 2025 Sharon Parq Associates, Inc.
Comments