The acronym RAM stands for Random Access Memory. It's the memory that you have in your computer system; it is not "memory" in a storage device, such as a hard drive. Memory is critical to the proper operation of your system, so it's important that you not only have an adequate amount of memory but also that what's in your computer is operating as it should. Although it doesn't happen too often, it is possible for memory to go bad. Fortunately, Windows provides an easy way to check for faulty RAM.
Windows is usually aware when there may be a memory-related problem. If it detects a problem you will suddenly be prompted to run the built-in Memory Diagnostics Tool. You can, however, run the tool manually if you wish. To do so, use the search capabilities in Windows to look for "memory," without the quotes. You should see in the search results an item named "Windows Memory Diagnostic." This is the app you want to run. In short order Windows displays the Windows Memory Diagnostic dialog box. (See Figure 1.)
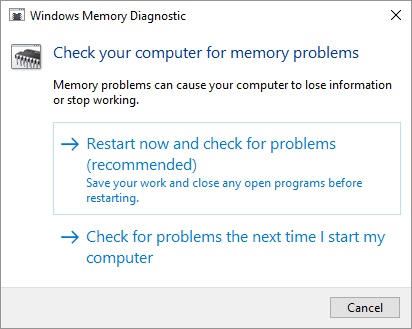
Figure 1. Windows Memory Diagnostic screen.
At this point you can choose to restart your system immediately and have it run diagnostics, or you can indicate that you want to run diagnostics the next time you restart your computer. (If you change your mind and don't want to run the diagnostics at all, just click Cancel.)
Assuming you've selected one of the two options, the memory diagnostics tool automatically begins running the next time your computer restarts. Upon its restart, memory tests will be run even before you're able to login again. It runs automatically, but you can alter its behavior by pressing the F1 key while it's running to change options. The options you can change include: Test Mix, Cache, and Pass Count.
The Text Mix option allows you to specify whether you want it to run the Basic, Standard, or Extended set of tests. The Cache option allows you to specify whether cache is on, off, or whether the default cache setting of each test should be used. The Pass Count option allows you to specify the number of passes the diagnostic should run before quitting. This can be set to a number from zero (meaning an infinite number of passes) to 99.
When the tests are completed, the system is automatically restarted, and when you login you will see the results of the tests in the System Notification Area (i.e., the System Tray).
![]()
![]()
![]() This tip (13099) applies to Windows 7, 8, and 10.
This tip (13099) applies to Windows 7, 8, and 10.
Mouse not working as you expect? Here are a few things that may get things back to the way they should be.
Discover MoreYou can easily change which power scheme is active by using the SetActive switch. This tip shows you how.
Discover MoreThe battery in your laptop provides the power you need to even use the system. As you use your laptop, you may notice ...
Discover MoreThere are currently no comments for this tip. (Be the first to leave your comment—just use the simple form above!)
Copyright © 2025 Sharon Parq Associates, Inc.

Comments