As you know, when your computer starts, several applications automatically start as well. These applications can live in a variety of different locations. If you had the time, you could systematically go through the various Registry keys and the on-disk locations of your startup programs, but with AutoRuns you don't have to. It knows of all the locations where startup programs can reside and presents them all to you in a comprehensive format.
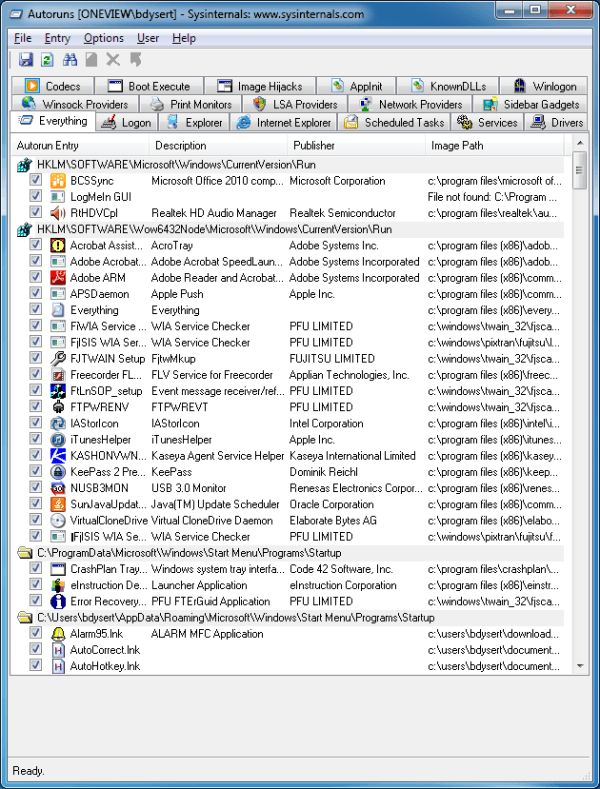
When AutoRuns is launched, it immediately goes about checking all the startup locations and builds lists of what all applications exist in those locations. You can then turn the applications on or off so you can regain control of how you system starts. (See Figure 1.)

Figure 1. AutoRuns initial screen.
Note that the Autoruns dialog box has quite a few tabs in it. The Everything tab is used to list all your startup programs in a single place. It shows each program's name, description, publisher, and location. As you go down the screen, you see where the startup program is coming from (e.g., "HKLM\SOFTWARE\Microsoft\Windows\CurrentVersion\Run") and under each location are the set of entries. If an entry has its checkbox checked, it will run upon startup. If you don't want that program to run at startup, simply uncheck its checkbox.
As you can tell from the many tabs, there is a whole lot of information available through the Autoruns utility. For example, going to the Logon tab shows you the programs that startup upon the logon of the selected user. (The selected user can be determined by clicking User on the menu bar at the top of the dialog box.)
If you uninstall a program, it will hopefully remove all vestiges of itself from your system, but often this doesn't happen and you're left with pointers to startup programs that no longer exist. You can find these by clicking the binoculars icon on the toolbar (just under the menu and above the tabs) and searching for "file not found." You'll then be quickly able to go through all of the entries where there is no startup program, right-click the entry, and select "Delete." Pressing the F3 key will keep taking you to the next entry where there's a "file not found" until you hit the bottom.
Another interesting tab is the "Scheduled Tasks" tab. It gives a brief snapshot of the scheduled tasks you'd find if you opened the Task Scheduler administrative tool. The "Services" tab is similar in that it provides a brief snapshot of what services are to be started when the computer comes up. Sometimes this is easier to see that by going to Start | Administrative Tools | Services and looking at them there.
AutoRuns is a free download that works with both Windows 7, 8, and 10. It can be retrieved from the following website:
http://technet.microsoft.com/en-us/sysinternals/bb963902
![]()
![]()
![]() This tip (12906) applies to Windows 7, 8, and 10.
This tip (12906) applies to Windows 7, 8, and 10.
Are you frustrated by your desktop icons moving around whenever you change your screen resolution or use Remote Desktop? ...
Discover MoreWith Windows 10 you can easily see how your data is being used. Even if you are not on a metered data plan, it can be ...
Discover MoreSometimes you have to get up quickly from your computer before you have time to lock it. With a paired phone and Dynamic ...
Discover MoreThere are currently no comments for this tip. (Be the first to leave your comment—just use the simple form above!)
Copyright © 2026 Sharon Parq Associates, Inc.
Comments