Repairing Your System Using a System Repair Disk

Written by Barry Dysert (last updated September 16, 2019)

3

Assuming you've created a system repair disk (which is covered in another tip), you can use it to get your system up and running if it crashes and cannot be booted via normal means. The first thing to do is to insert your repair disk. Now, power up your system and have it boot from the device containing the repair disk. You may have modified your BIOS to automatically boot from your CD/DVD drive, in which case you'll be booting from your repair disk. If your BIOS is not set to boot from CD/DVD, then shortly after you power up your system, you'll see a message to the effect of, "Press Any Key to Boot from CD or DVD". Immediately press a key. When prompted, click the Next button.

Next, the system looks for a valid Windows installation. Since your disk is a repair disk and not an installation disk, you should click Next to get to the next screen. At this point, select "Use Recovery Tools That Can Help Fix Problems Starting Windows" and click Next. You are now presented with the System Recovery Options dialog box which lists available tools you can use to assist in repairing your system. (See Figure 1.)

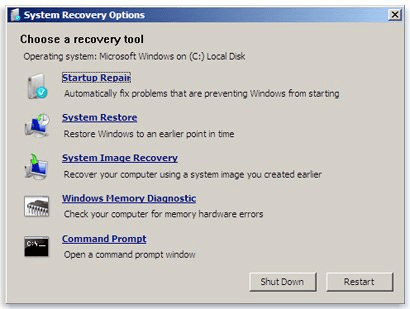
Figure 1. The System Recovery Options dialog box.

The dialog box lists several different tools you can use:

  • Startup Repair. This is a good initial attempt at repair. By selecting this option you're directing Windows to automatically try to fix what's preventing a normal reboot.
  • System Restore. This will present you with a list of "restore points" that have been made during the normal operation of the system. By choosing a recent restore point, you're essentially rolling back system changes that may have caused the problem. With this option, you will probably lose program changes (e.g., driver installations), but your data will be safe.
  • System Image Recovery. This will recover your system to the point where you initially made the repair disk. If your image disk is fairly old, though, you'll end up potentially losing a lot of data.
  • Windows Memory Diagnostic. This checks your system for memory errors. No data will be lost, and if it discovers memory errors the solution is as simple as replacing the bad module(s).
  • Command Prompt. This is for experienced Windows users who may have a toolbox of command-line tools that help them diagnose and repair problems.

Beginning with Windows 8, the System Recovery Options were replaced with Advanced Startup Options. To navigate to Advanced Startup Options if you are using a Windows 10 system, type "Settings" (without the quotes) in the search box and press Enter. Select Update & Security and then select the Recovery option. (If you are using Windows 8 system, go to PC Settings | Update and Recovery | Recovery.) (See Figure 2.)

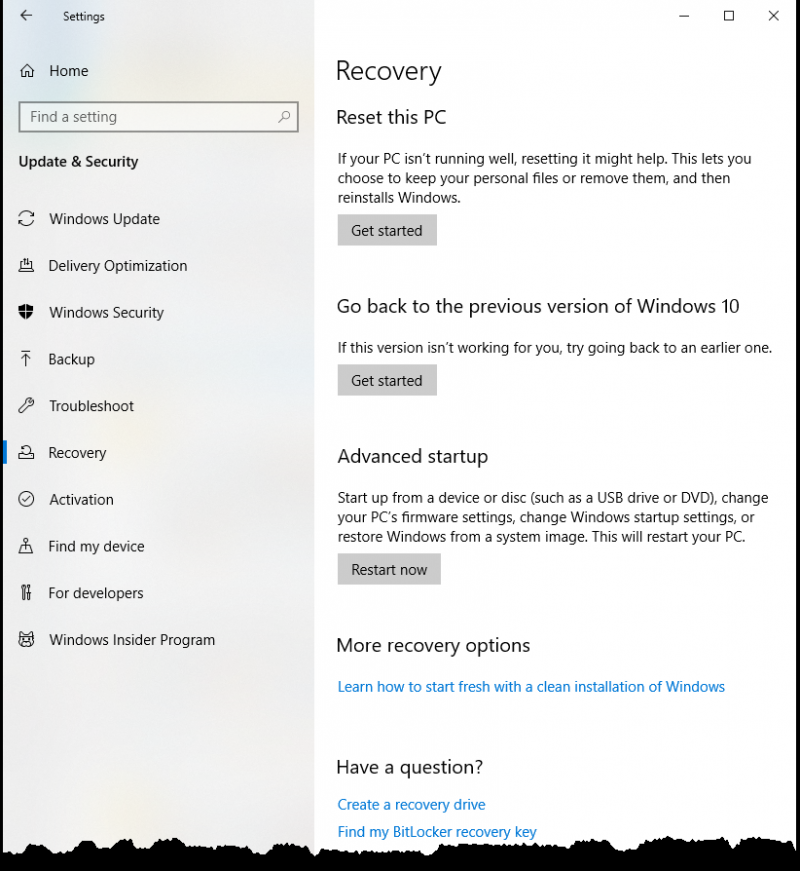
Figure 2. The Recovery tab of the Update & Security section of the Settings window.

Click the Restart Now button under the Advanced Startup heading. After the system asks you to "Please Wait" a Choose an Option screen is displayed allowing you to choose from a menu of three (or four) options:

  • Continue. Exit and continue to Windows 10. This option closes Advanced Startup Options and the computer will then restart and Windows will start in normal mode.
  • Use a Device. This option is only available on UEFI systems and may not be listed on the Choose an Option screen.
  • Troubleshoot. Reset your PC or see Advanced Options.
  • Turn off your PC.

Click the Troubleshoot option to open a menu with the following options:

  • Reset This PC. Lets you choose to keep or remove your personal files, and then reinstalls Windows.
  • Factory Image Restore. Restore your system software to a saved system image.
  • Advanced Options. This is the option to choose if you want to do anything other than close the Advanced Startup Options menu.

Click Advanced Options to open up a menu with options similar to those found on the System Recovery Options menu listed above for earlier versions of Windows. There a few new tools that are not found in the System Recovery Options menu:

  • Startup Settings. Change Windows startup behavior. This tool will restart your computer and bring up the Startup Settings window displaying a menu with various methods to boot Windows.
  • Uninstall Updates. Remove recently installed quality or feature updates from Windows.
  • UEFI Firmware Settings. Change settings in your PC's UEFI firmware.

 This tip (12671) applies to Windows 7, 8, and 10.

Author Bio

Barry Dysert

Barry has been a computer professional for over 35 years, working in different positions such as technical team leader, project manager, and software developer. He is currently a software engineer with an emphasis on developing custom applications under Microsoft Windows. When not working with Windows or writing Tips, Barry is an amateur writer. His first non-fiction book is titled "A Chronological Commentary of Revelation." ...

MORE FROM BARRY

Adding and Deleting Fonts

Sometimes a document you're working on needs a font different from what comes with Windows. In such a case, a simple Web ...

Discover More

Creating a Disk Partition

Partitioning your disk offers a quick and efficient means to make good use of your disk resources. By creating disk ...

Discover More

Scheduling a Program to Run on a Schedule

If you have certain programs that you want to have run automatically, you can use Windows Task Scheduler to quickly set ...

Discover More
More WindowsTips

Understanding ZIP Folders

Need to move a lot of information to someone else? The answer may be to store that information in a ZIP folder. Here's ...

Discover More

Mapping a Network Drive

You can create a mapping relationship between a network folder and a drive letter so that it's easy to access the folder ...

Discover More

Getting Rid of Old Windows Updates

Microsoft is constantly updating Windows for various reasons. For most people, those updates are downloaded and installed ...

Discover More
Comments

If you would like to add an image to your comment (not an avatar, but an image to help in making the point of your comment), include the characters [{fig}] (all 7 characters, in the sequence shown) in your comment text. You’ll be prompted to upload your image when you submit the comment. Maximum image size is 6Mpixels. Images larger than 600px wide or 1000px tall will be reduced. Up to three images may be included in a comment. All images are subject to review. Commenting privileges may be curtailed if inappropriate images are posted.

What is four minus 0?

2019-09-16 17:07:16

TW

Paul,
Here are 2 articles,
Creating a System Repair Disc
https://windows.tips.net/T012622_Creating_a_System_Repair_Disc.html

Creating a System Repair Disk on a USB Flash Drive
https://windows.tips.net/T012645_Creating_a_System_Repair_Disk_on_a_USB_Flash_Drive.html


2019-09-16 16:36:14

Eric

Paul -

Sorry the link to the other article is here: https://windows.tips.net/T012645

Hope this helps.

Eric


2019-09-16 07:09:24

Paul Hanson

Thank you for the article - I have bookmarked it for future reference. I do wonder if, in the first sentence, "which is covered in another tip" could be a hyperlink to that article?


Newest Tips