The Windows Taskbar is quite a bit improved over what it was in the days of yore. It now can sport bigger icons, provide thumbnail previews, support pinning and jump lists, etc. With all this extra functionality built into the Taskbar, it's no surprise that you can also customize it to change how tasks appear.
By default, each of your windows has a "large" icon in the Taskbar. Multiple windows from the same application (e.g., if you have several Windows Explorer windows open) are grouped together instead of individually stretching out across the Taskbar. Hovering your mouse pointer over a Taskbar icon brings up a live preview of the window. If an application has multiple windows, all of their previews are presented, and you can click any of the previews to be taken to that window.
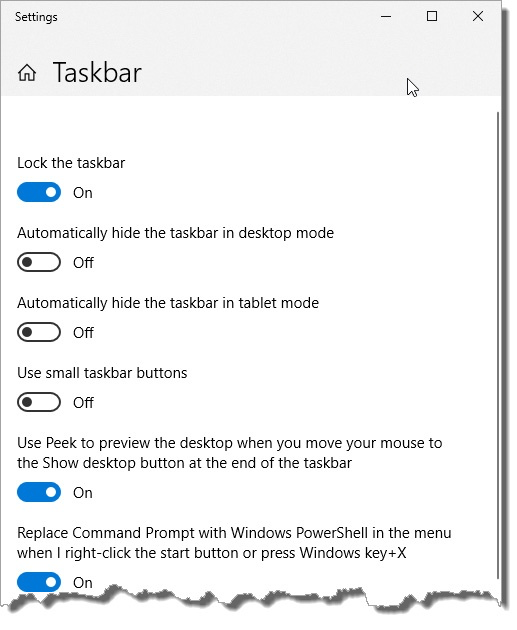
You can change the Taskbar to some extent. For example, you can have windows show smaller icons to represent your windows with in the taskbar. To make this change is simple and changes slightly based on your version of Windows. If you are using Windows 7, right-click an empty space on the Taskbar and select Properties from the pop-up menu. Windows displays the Taskbar and Start Menu Properties dialog box. With Windows 10, right-click an empty space in the Taskbar and select Taskbar Settings from the Context menu. Windows displays the Taskbar options of the Settings dialog box. (See Figure 1.)

Figure 1. The Taskbar and Start Menu Properties dialog box.
Click the "Use small icons" checkbox (Windows 7) and OK to change the size of the Taskbar icons. If you are using Windows 10, click the "Use small taskbar buttons" slider to turn this setting on. Regardless of the size of the icons, hovering over an icon presents the same-sized thumbnail previews.
As mentioned earlier, windows from the same application are grouped together in the Taskbar. With Windows 7, this is because of the "Always combine, hide labels" setting for the Taskbar Buttons drop-down list in the Taskbar and Start Menu Properties dialog box. Windows 10 refers to it as "Always, Hide Labels" in the Taskbar Settings of the Settings dialog box. If you don't want this behavior, you can change it by dropping down the list box and selecting either Combine when Taskbar is Full or Never Combine. Once you select a setting, click OK to have it take effect and dismiss the dialog box.
Icons come and go from the Taskbar as you open and close windows. You can "pin" applications to the Taskbar, though, so they're always there regardless of whether the application is currently running. In this way, a simple click of the pinned icon will launch the application.
For example, let's say that you want to pin the Calculator to the Taskbar. You first navigate to the application then right-click Calculator. From the Context menu, select Pin to Taskbar (Windows 7) or More | Pin to Taskbar (Windows 10), and the Calculator icon is pinned to the Taskbar. Now, whenever you want to launch the Calculator, just click the icon. To unpin an application, right-click the icon in the Taskbar and select Unpin this Program from Taskbar.
![]()
![]() This tip (12092) applies to Windows 7 and 10.
This tip (12092) applies to Windows 7 and 10.
When you want to start using Windows for real, you'll typically need to go through the Start menu to do it. This tip ...
Discover MoreIf you want to free up some space on the taskbar, consider eliminating Cortana's search box. This tip tells you how.
Discover MoreNormally the taskbar is used to display icons for currently running programs on your system. Here's how you can go beyond ...
Discover MoreThere are currently no comments for this tip. (Be the first to leave your comment—just use the simple form above!)
Copyright © 2025 Sharon Parq Associates, Inc.
Comments