Hiding the Taskbar when It is Not in Use
The Taskbar is an important part of the Windows interface. It appears at the bottom of the screen and includes the Start menu button, links to frequently used programs, Taskbar buttons for currently running programs, and a Notification area that includes lots of configuration icons.
Even though the Taskbar is important, you may want to hide it so that it doesn't detract from whatever you are working on at the time. Hiding it also allows you to "reclaim" more of the screen for the use of your programs. The way you control whether the Taskbar is displayed or not varies depending on your version of windows.
If you are using Windows 7, follow these steps:
- Right click somewhere within a blank area of the Taskbar. (Don't right-click one of the icons on the Taskbar; right-click an area that contains no icons.) Windows displays a Context menu.
- Choose Properties from the Context menu. Windows displays the Taskbar tab of the Taskbar and Start Menu Properties dialog box. (See Figure 1.)
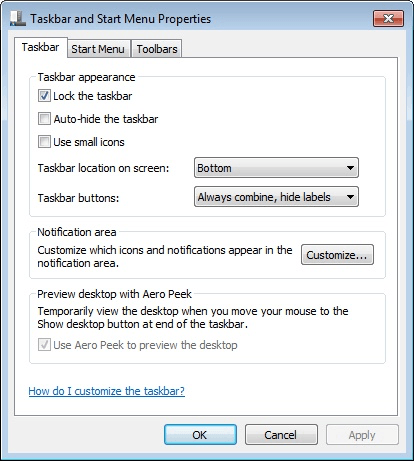
Figure 1. The Taskbar tab of the Taskbar and Start Menu Properties dialog box.
- Select the Auto-Hide the Taskbar check box.
- Click on OK.
Windows 10 users should, instead, follow these steps:
- Right click somewhere within a blank area of the Taskbar. (Don't right-click one of the icons on the Taskbar; right-click an area that contains no icons.) Windows displays a Context menu.
- Choose Taskbar Settings from the Context menu. Windows displays the Taskbar section of the Settings dialog box. (See Figure 2.)
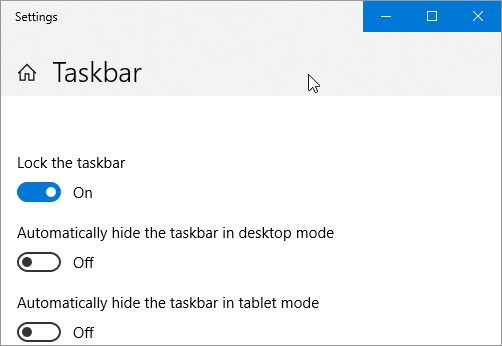
Figure 2. The Taskbar section of the Settings dialog box.
- If you are using Windows 10 on a desktop computer, select the Automatically Hide the Taskbar in Desktop Mode option. If you are using Windows 10 on a tablet, select the Automatically Hide the Taskbar in Tablet Mode option.
- Close the Settings dialog box.
The Taskbar should now be hidden. If you want to display it again, simply move the mouse pointer to the bottom of the screen where it would normally appear, and it should pop into view.

 This tip (10801) applies to Windows 7 and 10.
Author Bio
Allen Wyatt
With more than 50 non-fiction books and numerous magazine articles to his credit, Allen Wyatt is an internationally recognized author. He is president of Sharon Parq Associates, a computer and publishing services company. Learn more about Allen...
Adding Diagonal Borders
Want to add a border diagonally, through the middle of a table cell? It's easy if you follow the formatting steps ...
Discover More
Fixing Word
Need to make sure that Word is installed correctly from the original installation CDs? You can do it by using a command ...
Discover More
Keeping a Picture Title with the Picture
Pictures and their titles go together like peanut butter and jelly. (Wow, did I just say that?) Seriously, pictures and ...
Discover More
Pinning a Shortcut to the Taskbar
It's usually easy to pin items to the Taskbar. But if what you want to pin is not a shortcut to an application? This tip ...
Discover More
Adding a Toolbar to the Taskbar
Normally the taskbar is used to display icons for currently running programs on your system. Here's how you can go beyond ...
Discover More
Move the Windows 11 Taskbar to the Left
Windows 11's new Taskbar puts the Start menu and apps front and center. In this tip you learn how to move the Taskbar to ...
Discover More
Comments