Over the history of Windows computers, there have been a good number of file systems used to format disk drives so that you can store information on them. A rough overview is that file system is used to divide a drive into tracks and sectors, define how directory entries are stored on the drive, and establish limits as to what can be stored there.
In today's world of Windows, there are three general file systems you can use to format drives: NTFS, FAT32, and exFAT.
NTFS is an acronym for New Technology File System, and is arguably the oldest of the three file formats currently in use. It was first introduced with Windows NT, back in 1993. It is still used for any Windows system drives, meaning the drive on which Windows itself is actually installed. NTFS is a great choice if you are formatting hard drives installed inside your system. (More on external drives in a moment.) It supports huge files and supports larger hard drives than are commercially available.
FAT32 is an updated version of the very, very old FAT file system. FAT is an acronym for File Allocation Table. FAT32 was released in 1996 and allows for the storing of files up to 4GB in size. This is typically the default file system used for USB flash drives and many external hard drives.
The exFAT file system is the relative newcomer, being introduced in 2006. It was created to address some of the limitations in the FAT32 file system, most notably the 4GB file size limit. Under exFAT, you can store files up to 16 EB in size. (That's exabytes, which is impossibly large for today's disk drives.)
In general, if you are going to be sharing a drive (such as an external drive) with other systems, it is a good idea to make sure that drive is formatted using exFAT or FAT32. The reason is simple—all other systems can read and write both exFAT or FAT32, but Mac systems and most Linux systems can only read NTFS, not write to an NTFS-formatted drive.
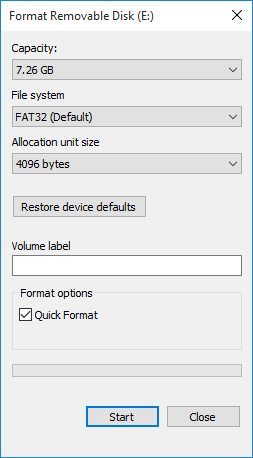
If you want to format a drive—which is the most common way to change the file system used on a drive—the easiest way is to press Win+E to display the Explorer window. Navigate (if necessary) until you can see each of the drives on your system. Right-click the drive you want to format and choose the Format option. Windows then displays the Format dialog box. (See Figure 1.)

Figure 1. The Format Removable Drive dialog box.
Use the File System drop-down list to choose which file system you want to use. The options in the drop-down list depend on the characteristics of the drive you are using, and they may be limited. For instance, if I choose to format a USB flash drive in this way, I have all three file systems available, but if I choose to format an internal drive, I only have NTFS available.
Understand that when you click the Start button, everything on the drive is erased. Thus, you should only format drives that are brand new or ones that you've backed up to other drives.
![]()
![]()
![]() This tip (13421) applies to Windows 7, 8, and 10.
This tip (13421) applies to Windows 7, 8, and 10.
The ChkDsk utility is a nice feature of Windows that lets you keep tabs on the health of your disk drives. This tip tells ...
Discover MoreThe NTFS file system is at the core of the Windows operating system. This tip explains a bit about it.
Discover MoreRestore points are good to have in case a problem occurs while trying to make changes to your system. If for some reason ...
Discover MoreThere are currently no comments for this tip. (Be the first to leave your comment—just use the simple form above!)
Copyright © 2025 Sharon Parq Associates, Inc.
Comments