There may come a time when you want to boot your Windows system from a USB flash drive. You obviously must first have created a bootable drive prior to trying to use it. This tip tells you how to create a bootable USB flash drive. Although there is software on the Internet to help you with this process, this tip shows how to create a bootable USB drive using native Windows commands.
First, plug in your USB drive. Note: Your flash drive must have at least 4 GB of free space and it will be formatted to NTFS. So either use a new drive or backup your data before creating this bootable USB. Otherwise you will lose all your data.
Next, get to a command prompt window and type "diskpart" (without the quotes) and press Enter. Once in the DiskPart utility, type "list disk" (again, without the quotes) and press Enter. DiskPart will list the disks it detects. (See Figure 1.)
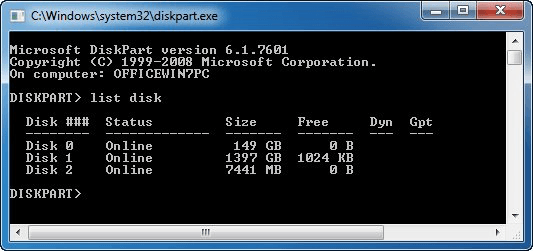
Figure 1. DiskPart's listing of the available disks.
I know by looking down the "Size" column that my USB disk is Disk 2. (If you're not sure, unplug your USB disk, and do another "list disk" to see which disk disappeared. Then plug it back in, do a third "list disk", and note the disk number of your USB disk.)
Going with Disk 2 as my USB disk, I enter the following lines in the DiskPart utility, ending each line by pressing the Enter key. (Also, on the first line you should change "2" to whatever disk is appropriate on your system.)
DISKPART> select disk 2
DISKPART> clean
DISKPART> create partition primary
DISKPART> select partition 1
DISKPART> active
DISKPART> format fs=NTFS  QUICK
DISKPART> assign
DISKPART> exit
As you enter each command, DiskPart displays a status message to keep you informed as to what it is doing. When these steps are done you should be out of the DiskPart utility and back to the command prompt. You now have a USB drive that is formatted using the NTFS file system and is therefore ready to be made bootable. To accomplish this, follow these steps:
C:\> cd /d d:\boot
D:\Boot> bootsect /nt60 f:
You now have a bootable USB drive. When you want to boot from it, plug it in, reboot Windows, and when it is starting interrupt it to specify that you want to boot from the USB. (Changing the BIOS to change boot-device order is beyond the scope of this tip.)
It is possible that you'll get an "access denied" error after performing step 3. If you do, it simply means that you need to open a command window using the administrator's rights. To do so, click the Start button and type "cmd" followed by Ctrl+Shift+Enter. Then you should be able to perform steps 2 through 4 with no problems.
![]() This tip (12620) applies to Windows 7.
This tip (12620) applies to Windows 7.
All objects on your computer (e.g., files) have permissions that allow or deny various types of access. This tip shows ...
Discover MoreWindows is quite configurable. It even allows you to change the drive letters associated with your disk drives. Although ...
Discover MoreYou can easily determine how many files and folders there are within a folder by making quick use of Windows Explorer or ...
Discover More2015-10-07 05:01:42
Dennis
Can you do this if Windows came pre-installed and you don't have a Windows disk?
Copyright © 2026 Sharon Parq Associates, Inc.

Comments