In previous versions of Windows, Windows offered Remote Assistance which allows you to remotely, on the same network, receive or offer assistance from another user on their computer. With Windows 10 we now have Quick Assist to help fulfill this need. While Quick Assist is similar to Remote Assistance, in that you can remotely see and control another user's computer (with their permission), Quick Assist only works between Windows 10 computers. To get started with Quick Assist:
Alternatively, after clicking the Start button, or in the search bar, type Quick Assist and press Enter. No matter how you choose to get there, Windows opens the Quick Assist app. (See Figure 1.)
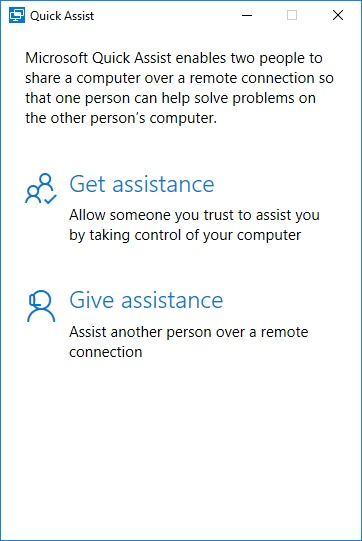
Figure 1. The Quick Assist dialog box.
Once Quick Assist is running you are presented with two options: You can Get Assistance, where you allow someone you trust to take control of your computer. It is important to remember that if you get assistance, it's important that you trust them. You will be turning control of your computer over to them, so be sure you're comfortable with this. Your other option is that you can Give Assistance, where you assist another person.
Giving Assistance
To give assistance, click the Give Assistance link. You are shown the Microsoft Sign In screen. Enter your Email, Phone, or Skype information, then click Next. On the next screen, enter your password. Once you have entered your password, and you're logged in, the Share Security Code screen is displayed. (See Figure 2.)
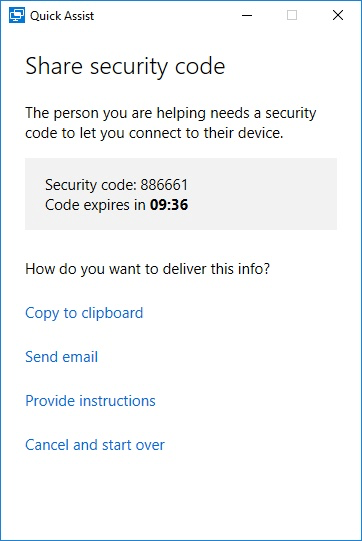
Figure 2. The Quick Assist Share Security Code dialog box.
Note that the screen shows you a six-digit security code that you will need to relay to the person you are helping. This security code, once displayed, is only valid for ten minutes. Quick Assist displays a countdown timer alerting you to how long it is still valid. If the timer ends before the connection is made, a new security code is generated and the timer starts over.
When you are on the Share Security Code screen you have four options: Copy to Clipboard, Send Email, Provide Instructions, and Cancel and Start Over.
To help the person you are assisting, they need to start Quick Assist and following the steps detailed in the next section of this tip.
Getting Assistance
To get assistance from someone else, that person needs to send you a six-digit security code, as discussed in the previous section. You, however, need to click the Get Assistance link. When you do, Quick Assist displays the Enter Code screen. (See Figure 3.)
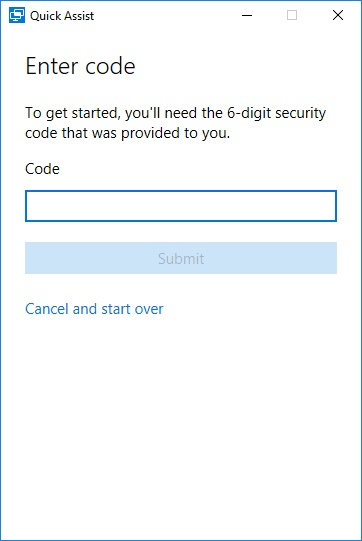
Figure 3. The Quick Assist Enter Code dialog box.
Enter the 6-digit code the person helping you sent to you, then click Submit. Quick Assist then prompts you for permission to continue. Be sure that the person you are giving access to your computer is someone that you trust. (See Figure 4.)
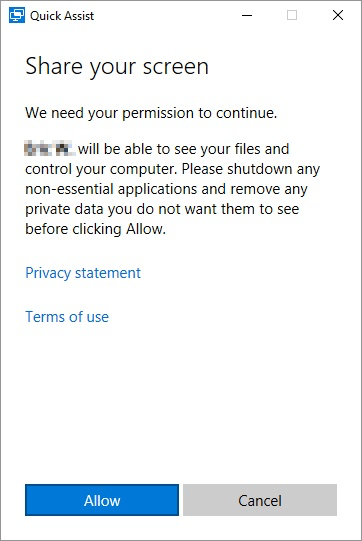
Figure 4. The Quick Assist Share Your Screen dialog box.
If you agree to the warning that Quick Assist provides, click Allow; if not you can choose Cancel. Once you allow access, the person giving assistance has complete control of your system from their system.
With Quick Assist, you will be able to quickly connect to other Windows 10 users and provide the tech support your family has been asking for.
![]() This tip (13538) applies to Windows 10.
This tip (13538) applies to Windows 10.
Your local meteorologist has access to some handy weather maps. With Windows 10 and the Weather app, you have access to ...
Discover MoreTime today is a trackable in many ways. Windows 10 includes the Alarm & Clock app that allows you to manage time in ...
Discover MoreThe Mail app is a great way to access your e-mail. This tip shows you how to get started quickly and easily.
Discover MoreThere are currently no comments for this tip. (Be the first to leave your comment—just use the simple form above!)
Copyright © 2024 Sharon Parq Associates, Inc.
Comments